
 Hi folks :) Welcome back again, and this is my combination guide for putting Set A (unit 1/2/3) and Set B (unit 4/5/6) together to form a more 3D canvas mecha base ;)The Basic
 The picture above illustrated 2 units of mecha chain bases, 1 from unit 1/2/3 and the other from unit 4/5/6.
The measurement is 15cm wide (width) x 15 cm deep (depth) x 15~16cm tall (height), but the terms used here would be a little complicated as compared to the previous 2 guides...
The above configuration uses 2 units but since there's 2 different sets in play, I would use W1 to represent wall-piece from Set A (1/2/3) and W2 for Set B (4/5/6); same goes with F1 and F2 for the floor-piece.
W1 = wall-piece from set A (unit 1/2/3) W2 = wall-piece from set B (unit 4/5/6) F1 = floor-piece from set A (unit 1/2/3) F2 = floor-piece from set B (unit 4/5/6)Configuration 1: 1 width x 1 depth x 1 height (1xW1 + 1xW2 + 1xF1) [2 units]Unused piece(s): 1 x floor-piece
 With this combination, it is suitable for simple backdrop/diorama for almost any HG 1/144 model kits where the kit's height is usually between 12cm to 14 cm. This conbination would not be enough for MG or 1/100 since the kit's height is mainly between 17cm to 22cm. You could see the illustration above with my 1/144 Gundam Exia and 1/100 MG GP01Fb. Configuration 2: 2 width x 1 depth x 1 height (2xW1 + 1xW2 + 2xF1) [3 units]Unused piece(s): 1 x floor-piece
 The above is the horizontal combination of 2 units from Set A (1/2/3) and 1 unit from Set B (4/5/6). Only 2 floor-piece from Set A are used here but you can still "chain" the floor-piece from Set B if you want ;)
This combination gives more space for 1/144 posing but since it is only 1 height, it couldn't provide a full backdrop for MG or 1/100 kits. Configuration 3: 1 width x 2 depth x 1 height (1xW1 + 2xW2 + 1xF1 + 1xF2) [3 units]Unused piece(s): 1 x floor-piece 
 The above is the other way round, with 1 unit from Set A (1/2/3) and 2 units from Set B (4/5/6). For this demo, I used 1 floor-piece from each set to show that they could be "chain" :)
Same as the configuration 2, this combination gives more space for 1/144 posing but since it is only 1 height, it couldn't provide a full backdrop for MG or 1/100 kits. Configuration 4: 2 width x 2 depth x 1 height (2xW1 + 2xW2 + 2xF1 + 2x F2) [4 units]Unused piece(s): none This is the perfect combination for 1/144 scale! It uses 2 units from each set and leave no unused pieces around ;) This is why my promotion for bootleg Mecha Base is based on 4 units and not 6 units like most seller does ;)I've lost the pictures for this combination but will retake and update in due time ;) Just refers to configuration 7 for the time being, minus 1 height ;)Configuration 5: 2 width x 1 depth x 2 height (4xW1 + 2xW2 + 2xF1) [6 units]Unused piece(s): 4 x floor-piece
 This combination is essentially the same with configuration 2 but with 2 heights to cater for 1/100 and 1/60 models. This has little space for 1/60 model since it is only with 1 depth :PThis configuration would also leave you 4 unused floor-pieces which you can combined into another wall-less base ;)
 Configuration 6: 1 width x 2 depth x 2 height (2xW1 + 4xW2 + 1xF1 + 1xF2) [6 units]Unused piece(s): 4 x floor-piece
 This combination is essentially the same with configuration 3 but with 2 heights to cater for 1/100 and 1/60 models. This has little space for 1/60 model since it is only with 1 width :P Same as configuration 5, this would also leave you 4 unused floor-pieces which you can combined into another wall-less base ;)
  Configuration 7: 2 width x 2 depth x 2 height (4xW1 + 4xW2 + 2xF1 + 2xF2) [8 units] Unused piece(s): 4 x floor-piece This combination is essentially the same with configuration 4 but with 2 heights to cater for 1/100 and 1/60 models. Although this combination would also leave 4 unused floor-pieces, this is still the best combination for 1/100 or 1/60 model as the 4 floor-pieces could be made into ceiling with very little effort ;)So, ever thinking of getting 2 sets of my promotion? Further discount if getting 2 sets of 4 units from me ;)Configuration 8: 3 width x 3 depth x 2 height (6xW1 + 6xW2 + 6xF1 + 3xF2) [12 units] Unused piece(s): 3 x floor-piece
 This is the combination I personally used for most of my photo-shooting as you might have observed ;) We usually needed a bigger canvas for photo-shooting so the 3 widths and 3 depths provides just that ;)
 I hope you guys have enjoyed this so far ;) until I get my hand on Set C (unit 7/8/9/10), this would be the conclusion with Set A and Set B.Fin

 It's been a while after my combination guide for Mechanical Chain Base unit 1, 2 & 3 :) In fact, these are available in my Facebook photo album for quite some time already :PThe Basic
 The picture above illustrated 1 unit of mecha chain base from either unit 4, 5 or 6 as they are from the same set that shares the same floor piece and wall piece that could be "chain" together ;) The measurement is 15cm wide (width) x 15 cm deep (depth) x 15~16cm tall (height), so I would take 1 width x 1 depth x 1 height for 1 unit. The picture shown exactly what I meant ;) 1 width x 1 depth x 1 height (1 unit)
 With 1 unit, it is suitable for simple backdrop/diorama for almost any HG 1/144 model kits where the kit's height is usually between 12cm to 14 cm. 1 unit would not be enough for MG or 1/100 since the kit's height is mainly between 17cm to 22cm. You could see the illustration above with my 1/144 God Gundam and 1/100 Red Frame. 2 width x 1 depth x 1 height (2 units)
 The above is the horizontal combination of 2 units. This combination gives more space for 1/144 posing but since it is only 1 height, it couldn't provide a full backdrop for MG or 1/100 kits. 1 width x 2 depth x 2 height (2 units)
 The above is the vertical combination of 2 units. This combination gives more height for 1/100, and even 1/60 posing but since it is only 1 width, it would have kind of limited space for creative posing.
  2 width x 2 depth x 2 height (4 units) This is one of the best combination for starters ;) Be warned, you'll get addicted and you'll want more :p With this combination, you have enough height to provide a nice backdrop for 1/144 to 1/60, and have decent foot space for creative posing as well :) You can even use an action base with MG or 1/100 and it still within the height of the nice backdrop for picture-snapping ;) 3 width x 2 depth x 2 height (6 units)
 If you could afford the extra cash (I would recommend the bootleg in this circumstances, as the quality is pretty decent... RM240 vs RM150... saving of RM90 is a lot to me and I am willing to put up with a little lack in quality here :p), do get 6 units and make it to 3x2x2 which gives you a lot more creative space ;)
 Next would be the combination guide for both set... stay tuned ;)
Fin :)

 Hi guys :) how's things? For those whose followed my blog regularly, I'm sure you are expecting this ;) Yes, the Mc Model Nu Gundoom Heavy Weapon System (HWS).Manufacturer: Mc Model
Scale: 1/144
Grade: HG Origin: Char's Counter Attack Side Story
Price: RM95 - RM125 (could be higher...) Mc Model never seize to amaze, and never seize to squeeze every cents possible with the HG Nu Gundoom series coming out with the Heavy Weapon System of Nu Gundoom ;)Part 1: Box ArtPretty impressive box art, and the box a actually VERY BIG consider this is only a HG! The side arts itself already illustrated the possible posing of the HWS which are very nicely done ;)As usual for Mc Model, the inner box had the Amuro emblem and the instruction manual is very very nice.


 Part 2: RunnersAt the first glance, I am quite disappointed due to the whites are greyish in color... same issue with the SD Ex-S Gundoom and 2nd batch of HG Hi-Nu Gundoom released a while ago... it does not affect the overall quality of the kit but the discoloration is disappointing to straight-builder like me, and should not be happening should Mc Model value their reputation!


 Part 3: Stickers, Decals and ExtrasThis kit comes with the usual stickers for the eyes and sensors, as well as part of the fin funnels. As the premium for 1st batch (as I was told), there's also a set of water slides decals given, which is a very nice addition to make the kit nicer ;)There is also a very thoughtful extra which is a small paper box resemble the miniaturize model box for us modeller to keep the extra/unused parts :)


 Part 4: WeaponryYes, I start with weaponry for this kit... well, at least the Heavy Weapons :PThe Big Big CannonI love this cannon! It is MASSIVE with SUPERB detailing, and is taller/longer than a HG RX-78-2! As you could see from the pictures below, this cannon can expand to an even longer mode! Easily the best weapon so far I have assembled for gunpla ;)


 The Big Big ShieldThis big shield would be second to GP02A massive shield :) Nice detailing.


 I know there are the beam rifle, bazooka and beam sabers but since they are the same as the earlier Nu Gundoom, I'll leave them to later ;)Part 5: LegsThe legs are very nicely done. Great detailing similar to the earlier Nu Gundoom, with the exact same design ;) The legs seems longer than the Nu Gundoom (left) due to the "high-heel"... the additional feet armor add-on :PWhen I were doing my Nu Gundoom previously, I used silver color to panel line the darker parts so I decided to use gold color for the HWS, and the result is satisfactory ;)The articulations are pretty good for a HG.
 Parts 6: WaistThe additional skirt armors are very done with excellent detailing! I just wish that the thrusters at the front skirt are separated ;)By the way, I did not take a picture but the front skirt armor could be lowered to show the missiles pods ;)

 Legs + WaistLooks pretty nice ;)


 Part 7: Body & BackpackThe body are also very nicely done, but most of the details are hidden under the additional armor :P The shoulder missile pods are all white but I'd colored them red instead.There are pretty good detailing for the backpack. I also colored the thrusters with gold color to make it looks nicer than it already has :) Same as the previous Nu Gundoom, the weapon holder at the left and right side of the backpack could be swapped for double-fin-funnels configuration like what I did to my Nu Gundoom at the left, the standard configuration (left - Fin Funnel, right - beam saber) or the double-bazooka configuration using the beam saber holder at both side ;)


 Body + Waist + Legs

 Part 8: ShouldersThe basic shoulders are same as Nu Gundoom, and the additional armor just fit on top of the basic :) I am a little disappointed for this piece as the seam lines are very obvious and the alignment is a bit off as you can see from the 2nd picture below... this should have been done with 3-piece (top/left/right) instead of 2-piece (left/right).
 Part 9: ArmsNu Gundoom has different setup for its left and right arm. Detailing are very nice and articulations, including the shoulder, are pretty nicely maintained.Right Arm

 Left Arm

 Body + Arms + Waist + Legs

 Part 10: HeadA lot of people does not like the head, but I like the detailing and the way it is made... the helmet, the face and the chin are all separate 1-piece, with the face and chin are slotted into the helmet from bottom. This thoughtful parts separation would be cheered by a lot of modellers who like to paint their kit ;)

 Head + the Rest...
 Part 11: Completed Kit with Fin FunnelsSide-by-side comparison between Nu Gundoom and the HWS version ;)

 Part 12: Rest of the WeaponsHyper BazookaExactly the same as previous, only the greyish white this time :(
 Beam RifleExactly the same as previous too, with only the greyish white this time :(
 ShieldWell... there's this Big Big shield clipped on to the normal shield for the HWS ;) It would look nicer after I complete the application of water-slide decals ;)
 Part 13: More PosingHere's the normal HWS configuration, but there's a lot of possibility with this model especially those who have got the normal HG Nu Gundoom from Mc Model previously ;)
  Quadruple Beam Saber ConfigurationUltimate close-range combat ... borrowed 2 bran sabers from Nu Gundoom ;)


 Quadruple Hyper-Bazookas ConfigurationMaximum fire power! Well, you know where the other 2 hyper bazooka comes from ;)


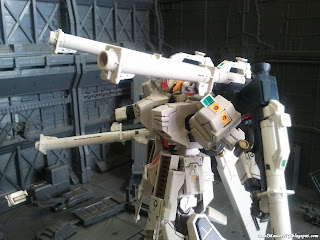


 Twin Fin-Funnels Configuration
Ultimate assault configuration ;) This kit only comes with 1 set of Fin Funnels so you've got to "borrow" them from the Nu Gundoom :P


 Size ComparisonSide-by-side with HGUC 1/144 RX-78-2 G30th and MG Deathscythe EW.
 Quick ReviewPlastic quality
The plastic is softer than the like of Bandai and TT Hongli, so extra caution needed when trimming as one might over-trim.Detailing
As usual for Mc Model, the detailing is very nicely done. You might want to consider panel line with gold/silver ;)
ArticulationsArticulations are pretty nicely done ;)- Head/Neck: Good, but useless since the head is sandwiched between the 2 missile pods :P
- Shoulder: Fantastic! Very highly pose-able.
- Arm/Elbow: Good.
- Wrist: Normal.
- Hand: Fixed hand, but nice selection given ;)
- Waist: Good.
- Skirt Armour: Good.
- Hip/Tight: Normal, as ball-joints are used.
- Knee: Good.
- Ankle: Normal+
Looks and Feels
The end product is as tall as the Gundam W MG series such as Deathscythe EW, and almost twice as tall as an ordinary HGUC kit!
Initially, I do not intend to get this since I have had the normal Nu Gundoom but I do not regret getting this once I started with the big big cannon and big big shield ;)
This kit is as expensive as the Bandai counterpart, but with the same amount of money, I would spend on this kit rather than the Bandai kit... to proof this, I do not own a Bandai Nu Gundam HWS at all :P
I usually recommend people to support the original, but that statement does not apply to this kit! For those who missed the Nu Gundoom, or those who have the intention to get the Bandai Nu Gundam HWS, get THIS instead ;)
Fin


